
Guides - Customer information
Customer information
Under ‘Customer information' you can view all information registered about a customer. This includes the customer's contact information, as well as all bookings and purchases made by the customer. The customer information represents the customer's profile.
At the top right corner you have the following options:
Depending on which add-ons you have purchased, your options on this page will vary. The screenshots shown in this guide show a booking system where the Questionnaire Add-On, the Cash Register Add-On and the Gift Voucher Add-On have been purchased. By opening the different tabs, you can see the information registered about a customer in the chosen category. |

Documents:
Under 'Documents' you can create documents directly via the customer profile. To make use of documents, the purchase of the Document add-on is required. Furthermore, you will need to have some documents created in order to retreive them here. Therefore, read the guide 'Create document' first. In order to create documents via the customer profile, choose the document you wish to create in the drop down menu. Next, press the button 'Create'. You will then see a page where you will be able to act on the document so to speak. At the top you can see the status of the document, showing who is supposed to act on the document, e.g. to confirm the document. In the example below, you will see a referral that has 'Back-end/administration' as the initiator and the one allowed to fill out the document, which is why the status says 'Awaiting Back-end/administration'. NB! How this page looks like and the documents that are shown, depends on how you have created these and the persons of interest that you have marked, meaning those who can create and/or initiate as well as fill out the document. If you have created another kind of document, the status can also be 'Awaiting customer' or 'Awaiting contact person'.
The documents will appear on the customer profile as the example below. If the document is finished, it will be evident under 'Status' of the specific document. If the status is 'Awaiting' an action from another part, you will still be able to edit the document by pressing 'Edit' opposite it. On the tab 'Documents' it will also be evident if the specific customer has documents that are unfinished.
|


Customer forms:
Under ‘Customer forms' you can see all forms that the customer has filled out. To make use of forms, the purchase of the Questionnaire Add-On is required. Also see the guide 'What are forms' or 'Customer forms' for more information. |

Active reservations:
Under ‘Active reservations' you can see bookings made by the customer that are not yet completed. You cannot change the bookings here, however, you can click on 'Go to specific booking' to be transferred to a page, where changes can be made. If you have activated ‘Extra spaces', you can see the extra information that the customer has filled out by hovering the pointer over the magnifying glass. You can also print a list of all active reservations. To the right under the reservations you can press three different buttons: Mail merge: If you press here you can retrieve different mail templates and merge them with a specific customer. In order to retrive these templates you have to have created them - read how you do this in the . SMS appointment card: If you press here, you can send an appointment card to a customer by SMS. The appointment card include all of the customer's active reservations. You can insert the information you want about the customer's bookings by using these Substitution codes. You can insert the codes and edit the SMS text via 'Settings' -> Texts'. Then choose the tab 'Online booking - SMS/Email' and press 'Booking - Appointment card - SMS'. In the SMS appointment card you can e.g. insert the following meaning that everything from 'Begin' to 'End' is repeated per booking: [customerFutureBookingsBegin_skipToday] When you have pressed the button as well as confirmed that you wish to send the appointment card, the button will then show 'Sent' along with a check mark. If a mobile number is missing you will be alerted about this. Print: If you press here, you are able to print the customer's active reservations. |

Rebooking:
If you have activated the 'Rebooking' feature, you can sign up the customer for automatic rebooking reminders. You can also read the guide 'Back-end describing how you activate rebooking and start the actual rebooking process. |

Customer information:
Under 'Customer information' you can see and edit the information that has been entered about the chosen customer. Under ‘Advanced settings' you can change the information you can see here (see Back-end. Customer for more information). Besides the basics, you have the following options:
In addition, it is shown when the customer was created, was last online, and from which IP-address this took place.
If you have purchased the cash register add-on you have the additional options:
If you have purchased the encrypted line/record add-on you can also write a record entry about the customer. Furthermore, you will be able to see whether the customer is linked to an existing debtor. From here, you can access the debtor account or choose to remove the link. Remember to click on ‘Update' to save any changes! |

 |
Please note! An orange exclamation mark next to the customer's e-mail address indicates that the last time the system attempted to send an e-mail to this address it failed. This is most often due to an incorrect e-mail address. The system will not attempt to send e-mails to this address again until it has been corrected. |
Record:
Under ‘Record' you are able to create record entries about customers. To make use of record entries, the purchase of the RecordAdd-On is required. Also see the guide 'Create record entry about customer' or 'Create fixed customer spaces' for more information. |

Contacts:
If you have activated the use of contacts, you can add one or multiple contact persons to the customer. |

Debtor postings:
Please note! You can only see the postings if the customer has been attatched to a debotr. If the customer is not attatched to a debtor or if the customer is attatched to a debtor that has several customers attatched, it is not possible to find any postings here.
You can read much more about debtors and debtor lists in the guide Debtor overview. |
 Under the tab 'Debtor postings' you can get a complete overview of the customers debtor postings. If a debtor has been attatched to the customer, the customers debtor postings will appear here. You can then press the + to the left side of the page to see futher information about each posting and can also see the invoices as pdf.
Ad hoc purchases:
Under 'Ad hoc purchases' you can add a purchase to the customer that (s)he has made in another system. Ad hoc purchases can, for instance, be used if you have an online shop that does not use GECKO Booking, and you want to transfer the purchases from this online shop to GECKO Booking in order to get a better overview. Ad hoc purchases do not appear on the cash register statistics and do not affect the status of the stock. However, the customer will still be able to earn points if the ad hoc purchase is of an item that are part of a reward program, which allows the customer to earn points for ad hoc purchases. Please note that ad hoc purchases require the purchase of the cash register add-on. |

Voucher purchases:
Under 'Voucher purchases' you can see a list of all the voucher purchases the customer has made. By clicking on ‘Go to/show' you get transferred to the chosen voucher. Please note that this requires the purchase of the gift voucher add-on. |

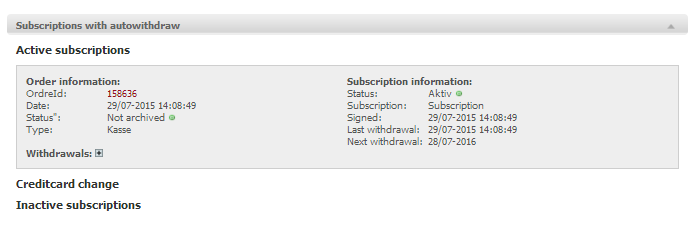
Subscriptions with autowithdraw:
Under 'Subscriptions with autowithdraw' you can view autowithdraw information on the customer, including both active and inactive subscriptions, as well as creditcard changes. |
Communication log:
Under 'Communication log' you can view a list of all the communication that has been sent to the customer. By substitution codes, specific booking you will be able to see further information, such as the specific service(s) the customer has received a e-mail confirmation or reminder about. |

Show log:
Under 'Show log' you can see which changes have been made for the customer, as well as who made these changes. |
