
Guides - Resource overview
Resource overview
At the resource overview you can get an overview of all the resources you have created and you have the option of creating new resources and resource groups. For more information about creating new resources and groups see Create new resource. You will find the resource overview via 'Settings' -> 'Resources'.
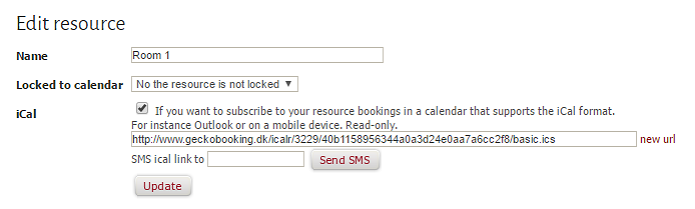
If you have created any resources, you can see a list of them divided between resource groups at the top of the page. Please note that even though resources marked as ‘Not in group' can be booked manually, they cannot be booked automatically. In order to enable automatic booking of a resource, the resource must be in a group (See Automatic booking of resources for more information). In addition, you have the oppotunity to see your resource bookings in a calendar that supports the iCal format. This is done by choosing 'Edit' opposite the resource you wish to edit in your 'List of resources'. Next, you need to put a tick in the box to the right of 'iCal' in order to activate this feature. Read more about the iCal feature here.
Remember to press 'Update' in order to save any changes! |

 |
Please note! When you delete a resource or a resource group, it only has an effect prospectively. This means that any automatic bookings already made of the resource remain listed under the specific bookings. However, you can no longer access the resource. If you have activated automatic booking of a deleted resource or from a deleted resource group, you must remember to deactivate this automatic resource booking under the settings of the service. This is very important in order to avoid errors! |
I højre hjørne øverst på siden har du mulighed for at oprette en ny ressource og en ny ressourcegruppe (Se Oprettelse af ny ressource for mere information). I højre hjørne kan du ligeledes trykke på knappen 'Indstillinger' og dermed rette og tilføje ressourcegrupper samt rette kalenderindstillinger. |
Under the first tab 'Resource groups' you will see a clear overview of your resource groups. If you have not already created such groups, you will be able to do that here. You create new resource groups by pressing 'Create new group' and then enter the name of the group. |

Under the next tab 'Calender settings' you are able to preselect/prioritise resources for specific employees. E.g. if you have a calendar called 'Anne' and that you want the resource 'Room 1' to be prioritised for this specific employee/calendar, you can set these caledar specific settings here. In order to prioritise the ressources, you need to press 'Edit' opposite a specific calendar. On the next page you should put a tick in 'Activate calendar specific priorities'. Next, you can mark the the resources that needs to be prioritised, by which these will be moved to the box 'Calendar specific priority'. The order in which the resources are placed in the box to the right, determines the order in which they will be booked. Finally, you need to press 'Update' to save your changes.
|

