
Guides - Settings
Settings
You can change the settings of each customer group separately by ticking (the feature is activated) or unticking (the feature is disabled) the box at the setting you want to change. Afterwards, click on ‘Update' located at the bottom of the page.
By opening the different tabs, you can see and change all customer group settings in the chosen category. |

 |
Please note! Under the settings of a customer group you have the option of deleting it. By deleting a customer group, you will delete all bookings, customers, statistics etc., belonging to this group. Deleting a customer group is permanent and cannot be undone. |
General:
Under 'General', you have the possibility to change the following general customer group settings:
Remember to click on 'Update' to save any changes! |

If you choose to inactivate a customer group as described above, it will have consequences different places in the system. First, it means that the following will no longer be send to a customer who is connected to an inactive customer group:
Furthermore, automatic withdrawals will no longer be completed for a customer who is in an inactive customer group. Second, there will also be changes for the customer group list and the customer information. If you inactivate a customer group, this group will have its own list under the list with the active customer groups.
On the customer information it will be indicated if the customer group that this customer belongs to is inactive. It will be indicated with the word 'Inactive'. Third, customers who are part of an inactive group will have limited login options. They will no longer be able to log in anymore. |

Customer booking:
Under 'Customer booking', you can change the following settings for customer booking:
Remember to click on ‘Update' to save any changes. |

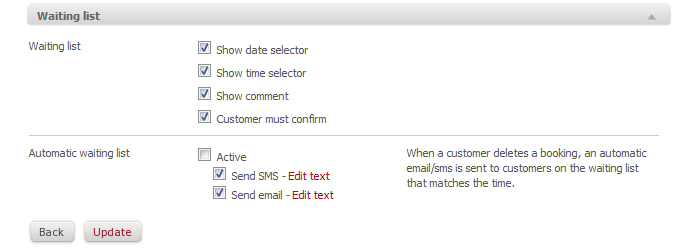
Waiting list:
Under 'Waiting list', you can select the information the customer should enter, when signing up for the waiting list. You can activate that the customer must enter a period and a time interval that (s)he wants the treatment to be within. Additionally, you can enable the customer to leave a comment, as well as activate that the customer must confirm the sign-up.
|
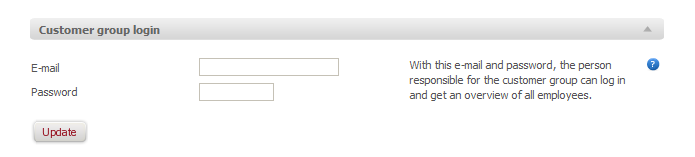
Customer group login:
Under 'Customer group login', you can change the following settings that allow you to use a customer group login:
Remember to click on 'Update' to save any changes. |
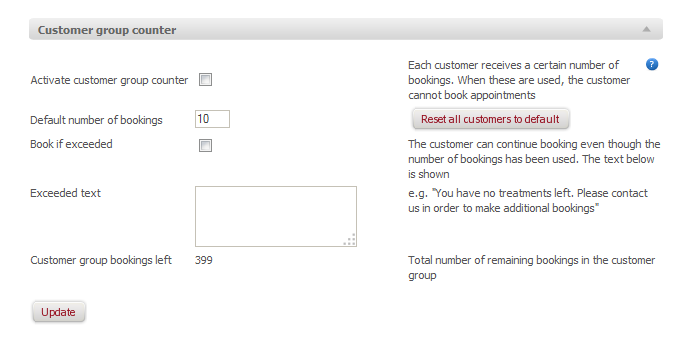
Customer group counter:
Under 'Customer group counter', you can change the following settings that allow you to use a customer group counter. Please note that this feature is used mainly for corporate customer agreements.
Remember to click on 'Update' to save any changes. |
Online payment:
Under 'Online payment', you have the following options:
Remember to click on ‘Update' to save any changes. |

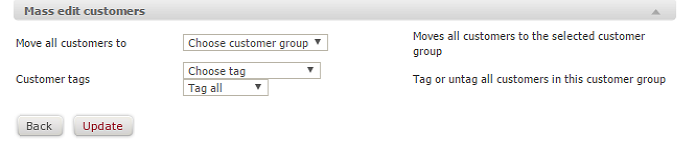
Mass edit customers:
Under 'Move all customers to' you have the opportunity to move all customers from a specific customer group to another customer group. Another option is to tag all customers in a customer group with a specific 'Customer tags'. You do this by choosing the desired tag in the drop-down menu. If you do not want them to keep their tag in the new group, you can choose 'Unmark all'. Remember to click on ‘Update' to save the changes. |
|
Please note! You can only choose one of the above-mentioned options. This means, that you EITHER choose to move all customers to another customer group OR move all customers to another customer group on the basis of their customer tags. |
Documents:
Under the last tab you have the following options: First, by putting a tick in 'Activate documents' you can allow your customers to see the documents you have created. You create theses via 'Settings' -> Documents'. Second, you can choose the 'Person of interest type'. This refers to the contact person that should have access to make changes in a document. Additionally, you can autocreate documents that will be automatically created once a day. You should choose a document in the drop down menu, determine if the document should be autocreated once or repeatedly and then add it. At the bottom of the page, you will be able to see the documents you have added to the specific customer group. |
